Wednesday, August 2, 2023

Project Avanti Super Sport moped

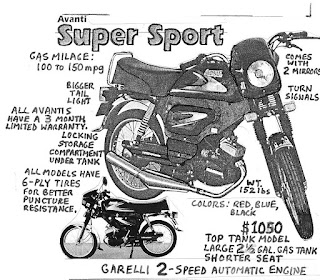
Here's the new project.  This 2001 Avanti moped from Monto Motors Limited (Rajasthan, India) was in a friend's collection, and it recently became available for adoption.  This is similar to the Cosmo Motors of Pennsylvania also used Monto Motors to produce the Avanti moped once again and distribute the Cosmo Stinger which was a copy of the Avanti Super Sport.  The moped uses a Garelli VIP engine, and has the two-speed automatic transmission.  Our friend said this was a very reliable machine, and it actually has over 4000 miles on it to prove it.  It has some modifications (a 70cc kit, right-side, inlet manifold, and non-stock carburetor).

This moped is a tubular frame construction, with a top-mounted fuel tank, just like a little motorcycle.  It holds 2.5 gallons of pre-mix fuel for a very long range machine!  It is a lightweight, attractive-looking modern moped.  Its been re-sprayed at least once and will need refreshed for appearance.  The body panels and seat are easily removed for cleaning and paint prep.  The tires are original and will need replacement.


A morning with a toothbrush and some cleaning solution have removed twenty years of grit and grime from the frame and chassis.  A certain future-rider got his hands dirty in the cleaning process.

The mechanical issues are few.  It is well made, and the electrical system is functioning.  One operational problem is the shift point from 1st to 2nd gear.  The engine has plenty of torque in first gear.  It would wind out much higher in RPM before it really needed to go to 2nd gear.  However, the transmission shifts into 2nd way too early and starts bogging.  We are eagerly awaiting new "Double Duck" clutches with a higher durometer material to go into production.  I suspect that the original rubber clutches have swollen and don't shift at the right points.

The handlebar clamp was a little concerning.  The wrong bolts were used at one point, and the casting was not looking great.  I fashioned a stainless steel cover to act as a washer and provide extra strength to the casting.

A leak in the fuel tank was discovered.  It was just a little weep.  A repair had been attempted using some polymer material, but that had already degraded.  Luckily everything was clean, and only required some roughing up and de-greasing.  I've used this trick before to seal up pinholes in gas tanks, and it works very well.  I got my biggest soldering iron, and some good flux and just soldered up around the whole mounting bracket.  (Yes, solder will stick to very clean steel)  No more leak.


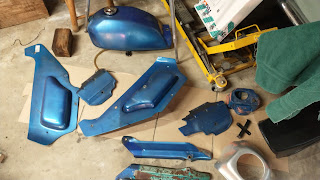
The general condition of the bike was "barn fresh" when we picked it up.  Parts had been re-sprayed at some point, and just didn't look good.  A new color was decided upon, and we went into full paint of the blue body parts into a new color.  We think it is very 1950's retro.


PHBG 15
62 Main Jet
(Needle 3rd notch from bottom)
262AU Atomizer
42 Idle Jet
60 Starter Jet
K&N Air Filter

Monday, July 17, 2023

Project Vespa Smallframe - AC Horn

The sound of the original DC horn operating on the clipped AC through a rectifier and capacitor filter, just wasn't satisfying me.  It doesn't sound the same as operated from a battery.  There had to be a way to make the horn louder.  After all it is a safety issue.  If you blow your horn, you want to be heard.

I had purchased a 12VAC horn from India via eBay.  It is a nice build quality, but of course it was made for a Primavera, and the hole pattern was too small to fit the unique 100 Sport.  I had pondered this for months, and really didn't give it any action until this rainy weekend.

Since the reproduction 12VAC horn hole pattern was smaller, I could potentially graft it to the original 100 Sport horn cover.  This would require removing the rivets, and make a paper pattern of the adapter.  I could then cut out the adapter ring from whatever metal I happened to have laying around the shop.  I could use the same soft-aluminum wire to make replacement rivets to hold the whole assembly together.  I had nothing to lose, the DC horn could still be put back together if I wasn't satisfied... I had already taken it apart once before.

Things came apart easily.  No photos taken during the Dremel tool cutoff disc work.

I got to work drafting the paper model of the adapter ring.

Here are all the parts that will be used.

After crafting each aluminum rivet one-by-one, we have a completed AC horn mechanism grafted to the original horn cover.  It sounds nice and loud.


Tuesday, July 11, 2023

Genuine Stella Airbox Idle Mix Screw threaded plug

 For my friends in the Genuine Stella Owners Group of America.

This plug will thread into the hole in the back of the airbox and cover the idle mix screw.

See STL file LINK.


Thursday, January 12, 2023

Project Vespa Smallframe - Toolbox

 So we've done an AC conversion to my best friend's Primavera.  It works great, but there's an empty spot where the battery used to be.  There isn't much space to carry tools on a smallframe Vespa, so I came up with an idea.  If I gut the dead battery and pull out all the plates, it would make a nifty toolbox.

So I rinsed the battery acid out several times while wearing chemical resistant gloves.  Then I took a dremel to the top of the battery case and separated it from the bottom.  I had to saw through the battery posts.

After knocking the inter-cell connectors apart with a chisel, I pulled the plates out and discarded them.  I found an old door hinge in the junk box and fastened that to the back of the battery case so that the lid would close down normally.  The battery-shaped tool box fits right back where it belongs and holds a few essential items in case a roadside repair is needed.