Showing posts with label Stella. Show all posts

Tuesday, September 9, 2025

Fuel Level Sender repair - Vespa PX and LML Stella scooters

I've been asked a few times on how I managed to make my Genuine Scooter Stella 2T fuel level sender reliable.  So when the opportunity to fix the sender unit on my friend's scooter came up, we decided to take photos this time.

The principle of the sender is very basic, but some of the materials chosen when it was manufactured were not ideal.  The sender works with a float on the end of a stiff wire arm.  When the float moves around the fulcrum pin, a wiper contact slides across a variable resistor.

The first step is to pry open the tabs which retain the cover over the mechanism.  It is wise not to over-bend these, because they are small and fragile.


Once the cover is removed, the mechanism is exposed.

The float goes up and down which moves a wiper contact along a nickel-chrome wire wound around an insulating material.  This forms a variable resistor.  The problem is that this insulating material is not very stiff and over time it bows away from the wiper in the middle.  When the nickel chrome wire is no longer in contact with the wiper it causes the gauge to read EMPTY.  Rather than risk snapping the small gauge nickel chrome wire and re-winding it on a different material, I have shaped pieces of non-copper-clad circuit board material into a fat "T shape" with the bottom of the "T shaped" piece 20mm wide.  The upper sides of the T are just to keep it from falling downward will be trimmed off to fit the cover back on, so I just eye them up before cutting them.  The final trim is done with a dremel cutoff tool.  If all you have is single-side copper clad board, just put the copper AWAY from the resistor.

It takes two of these to wedge the resistor back to a flat shape.  I use a file to remove some of the material of one of the T shaped pieces so they fit just right.  These aren't particularly critical, you can see I just cut them out roughly by hand using the dremel tool and didn't even bother with a straight edge.  The "T shapes" fit in from the top behind the resistor and should press down and straighten the resistor so its flat.


The resistor should be approximately 150 ohms at the empty position, and should decrease in resistance toward the full position.  If it doesn't read exactly 0 ohms when the float is all the way up, it doesn't really matter.  This one only went to 15 ohms, and worked fine when re-installed.  The video shows how we checked the operation with an analog multimeter.

Once the resistor is wedged to stay flat, the wiper stays in contact throughout the range of motion.  The cover can be replaced and the tabs gently bent back over to keep it in place.   This type of repair has lasted umpteen thousand miles.


Monday, September 26, 2022

Vespa PX LML Stella - Drilled Air Cleaner modification

 The reason I'm writing this one up, is because I had heard about this modification, but it took me a while to find out how to do it.  So borrowing from the tribal knowledge of many who came before me, here it is.

There is a space above the jets on the Spaco / Dell'Orto carb which is covered by the air cleaner.  This casting has a recess in it that is positioned directly over the top of the jets.  By allowing direct flow to the jets with the provided holes, the difference is amazing.  I don't have a dynamometer, but my "standard test hill" is the proof.  I increased one main jet size and was able to take on the test hill with cooler temperatures and 5mph faster than before.  This is the easiest and most beneficial modification to the 2T engine.

With credit to VespaLabs, here's the difference in the original and drilled air cleaner.


This modification altered the jetting :

DR177 and SITO+ Stock 20/20 carb 48/160 idle, 160 air, BE3 atomizer and a 107 main jet. Drilled stock air filter frame stripped and replaced with UNI foam.

Mix Turns = 2.0


Thursday, September 3, 2020

Additional Cooling for the Vespa PX engine

 My friend Bill installed Stella Auto cowls on his 2 stroke Stella shifty.  These are vented cowls that maintain a tasteful original look.  The Auto version of the Stella was only imported in small numbers in the United States (300 I believe) and parts are not readily available.  The claim was that additional engine cooling helped pull fresh cool air into the engine compartment to be available for the fan.  The engine does run cooler with no cowl at all, so any advantage is a plus.  Bill was seeing 15 to 20 degrees cooler cylinder head temperature.  That is an advantage I could use!

 I don't have the means to cut louvers or vents into the original cowl and make them look have decent.  The original cowl on my bike was damaged in a crash before I bought it.  The body filler and stickers make it look presentable today.  I do have a square sheet metal punch that is slightly smaller dimension than the checker tape on the lower part of the cowl.  This gave me an idea that I thought was pretty brilliant.  If I cut square holes in the center of a few of the black squares of checker tape, the holes wouldn't really be noticeable.  The additional airflow should be exactly what is needed to give the additional cooling.


The final carburetor settings after all the modifications DR177 kit, SITO+ exhaust, UNI foam air filter come out to be:

Stock 20/20 carb
40/120 idle
160 air
BE3 atomizer
106 main jet

I take the same road over Reesers Summit every Wednesday to meet up with the Three Mile Island Scooter Club.  This road run is the temperature test bed to prove if I knocked holes in the cowls for any good reason.

CHT without holes = 315 °F

CHT with holes = 306 °F


Stella PX DR177 kit

I may have mentioned in a previous post that always wanted a Vespa PX, but due to pressures of my biker friends that nothing less than 500cc's was going to keep up with them, I avoided purchasing scooters when they were at their height of popularity when the PX was re-released in the early 2000's.  When this wrecked Genuine Stella 2T came available locally on craigslist, it was too cheap to pass up.  That combined with my recent career move to a job closer to home, the time was right to jump into the scooter world.  Wrecked and abused, she served well for about a year or so.

The crank big-end bearing failed in a catastrophic manner.  Though she got me home that night, it was time for some major upgrades.


Night Flight

A red scooter is the best way to get around,
No other transport is finer that I have found.
A tank full of fuel will take you so far,
To visit with friends or hang at the bar.
After a dinner, its homeward we go,
Travel is pleasant its like we're on show.
Engine burble turns heads, like they've never seen,
So beautiful a cherished painted art scene.
My Italian-descended tibutation in style,
Nothing of late could bring such a smile.
A pinging was heard; whatever to do?
A loss of compression would surely ensue!
Darkness it came and I filled with dread.
It wasn't far to get back to the shed.
Coaxed up the hill giving all that she could,
The crest was ahead; I felt that we would.
Then plunged into darkness; nothing to see,
But a green lamp on the dash shining at me.
Off with the key and in with the clutch,
If I hit a tree, I'm sure it'd hurt much.
The whispers of wind was all that was heard,
The engine had died, and I uttered a word.
Word of complaint ruined my ride,
The headlamp was out! I could'a cried.
Some short distance more under the tree,
The moonlight provided little to see.
No push was needed; she showed such pride,
And that was the end of our valiant ride.


The search for more power is an ongoing effort when you buy a vehicle to rebuild.  I had already fitted the Sito+ exhaust fitted and re-jetted at the time of crank failure.  The logical step was to either buy a 200cc engine or do a kit for more cubes.  In a way it would have been easier to just drop in a ready-built engine, but where is the adventure in that!  I decided on the DR177 kit.  David at Scooter Mercato was a big help in making the right choices for good reliability and more torque.


First, let's say that the PX engine is a NASTY dirty thing when it is abused or neglected, whether it is an Indian or Italian engine.  The gearbox breather sits atop the engine.  The breather is capable of producing enough oil mist to cake the cases over time.  The overflow from the carb should not be a real issue, but it is something to watch.  I abhor dirty engines and oil leaks.  When I heard that most folks stand by the age-old grease on the gaskets approach, I was appalled.  Engines should be built to stand the test of time and not leak.  So after spending DAYS of scrubbing down this filthy mill I vowed to keep it clean.  That meant when it was time for re-assembly I was going to use Permatex "Right Stuff" and spray-on Gasket Sealants.  Whether it was needed or not, I also ran a road tube from the gearbox breather to the back of the engine.  It can't hurt to keep things cleaner.  The other addition is an exhaust spoon.  This is a piece of 1" stainless tubing cut out and cold-formed in a spoon shape.  The end clamps to the exhaust stub and is held in place with a hose clamp.  The idea is to re-direct the oily exhaust away from the rear tire without changing the dynamics of the 2 stroke exhaust chamber.

Another requirement was to keep the autolube system.  I hate mixing, the thought of having to mix oil every fuel stop was not something I ever wanted.  The autolube system is a technological innovation that I believe in.  Since the jump from 150cc to 177cc isn't a big one I figured that things should be lubricated just fine.  I usually dump a little Marvel Mystery Oil in anyway, so a little extra oil should be just fine.  The problem was that the 2009 year LML autolube carb box had a machining issue which would allow oil to go past the check ball and fill the crank chamber with a large charge of oil.  That would result in a large embarrassing cloud of smoke in the morning.  I tried to overcome it on my own, but if I was re-building the engine I didn't want to take any chances.  SIP shop had replacement autolube carb boxes available, so I bought one to put on.
(oh yes, I did!)


Since I was re-jetting anyway, another easy modification was for a more free-flowing air filter.  The white and blue material of the original was all oil-contaminated, so cutting it all off was an easy choice to make.  I had some leftover UNI filter material left over from a previous cycle overhaul.  That was easy to cut into the right diameter loop and slip over the original air filter frame.  It was cut the right shape to completely cover and insure good filtration with the best air flow possible.

The only thing I didn't change was the reeds.  The LML reeds seemed good, so I just put them back on.  This may prove an easy upgrade later.  Goodness knows with all the carb jet experimentation that I've done, going to a bigger jet is as easy as looking in the box of spare parts that I already bought.  So for now the original reeds should do.

After MUCH experimentation, a lot of reading other's accounts of what carb and jets they were using, I settled on the following.  This is based on plug chops, and cylinder head temperature readings.  The TrailTech gauge is battery powered and easily attaches to the glovebox on the scooter.  The wiring had to be extended to reach the whole way back to the cylinder, but that wasn't much of a problem.  Observations were that when the engine was running rich, the CHT gauge would read very low.  If it was too lean, of course the CHT readings would be too hot.  The trick was to find the happy medium of Main Jet that yielded a middle CHT reading without going too far above 300°F on a hard pull.


Stock 20/20 carb 
40/120 idle, 160 air, BE3 atomizer and a 106 main jet.
19° BTDC ignition timing.


Thursday, March 14, 2019

Feel the Love. It's Genuine.

In keeping with our tradition here of getting into something after its already been mainstream-cool, consider the scooter craze of several years back.  Mainstream-cool is like a fad and different than Always-cool.  Sorry, scooters will always be cool.  Remember when gasoline was $4 a gallon and scooters were all the rage?  Today you don't even really see many scooters.  At the height of the fad, I was totally in love with the Genuine Scooters model Stella.  They had just released the 4 stroke version and were developing the automatic.  My heart was with a Vespa-compatible 2 stroke however.  It was hard to justify since the barn already included a couple motorcycles.  So the lust for scooting was forgotten, until recently.

2018 was a year of unrest.  I changed jobs which resulted in an 9 mile commute, instead of the +30 mile commute that I was previously enduring.  This changed everything.  No longer would I have to travel the highway, and owning a scooter was well within reason.  The lust for scooting was renewed and the search was on!  I found a low mileage 2009 Stella 2T that had been laid over.  The bodywork wasn't too bad and the mechanical repairs were easy.  With a price tag less than $1000, how could I go wrong?  Plus what is the fun of buying something off the showroom floor!

The LML Star / Genuine Stella is an Indian made version of the Vespa PX150.  The parts are interchangeable, and this gives Stella a big advantage for longevity for the future.  The fit and finish is actually pretty good and I was satisfied with the new Stella scoots I had seen on showroom floors.  We can rebuild her... again and again if needed since the parts are interchangeable.  The PX engine clone was sold between 2003 and 2009, but the LML engine was reed valve instead of rotary.  Since LML stopped producing the Stella line, the logical choice was the 2T.  The four stroke and automatic at this point can't be expected to be supported very well.  I love an orphan vehicle as much as the next guy, but there's no point in subjecting oneself unnecessarily.

Key Specs
* Engine: 150cc 2-stroke, air-cooled single
* Power: 8.0 HP @ 5500 RPM (2-stroke)
* Transmission: 4 speed manual
* Bore & Stroke: 57.8 x 57.0mm (2-stroke)
* Fuel Delivery: Carb
* Wheelbase: 48.6”
* Weight: 240 lbs (2-stroke)
* Starter: Electric and Kick
* Seat height: 32.3”
* Fuel Tank: 2.1 gallon
* Oil Tank: 0.26 gllon
* Front Brake: Hydraulic Disc
* Rear Brake: 6” Drum
* Front Suspension: Trailing Link, Gabriel
* Rear Suspension: Single Gabriel Shock
* Tires: 3.5 x 10” (Front and Rear)

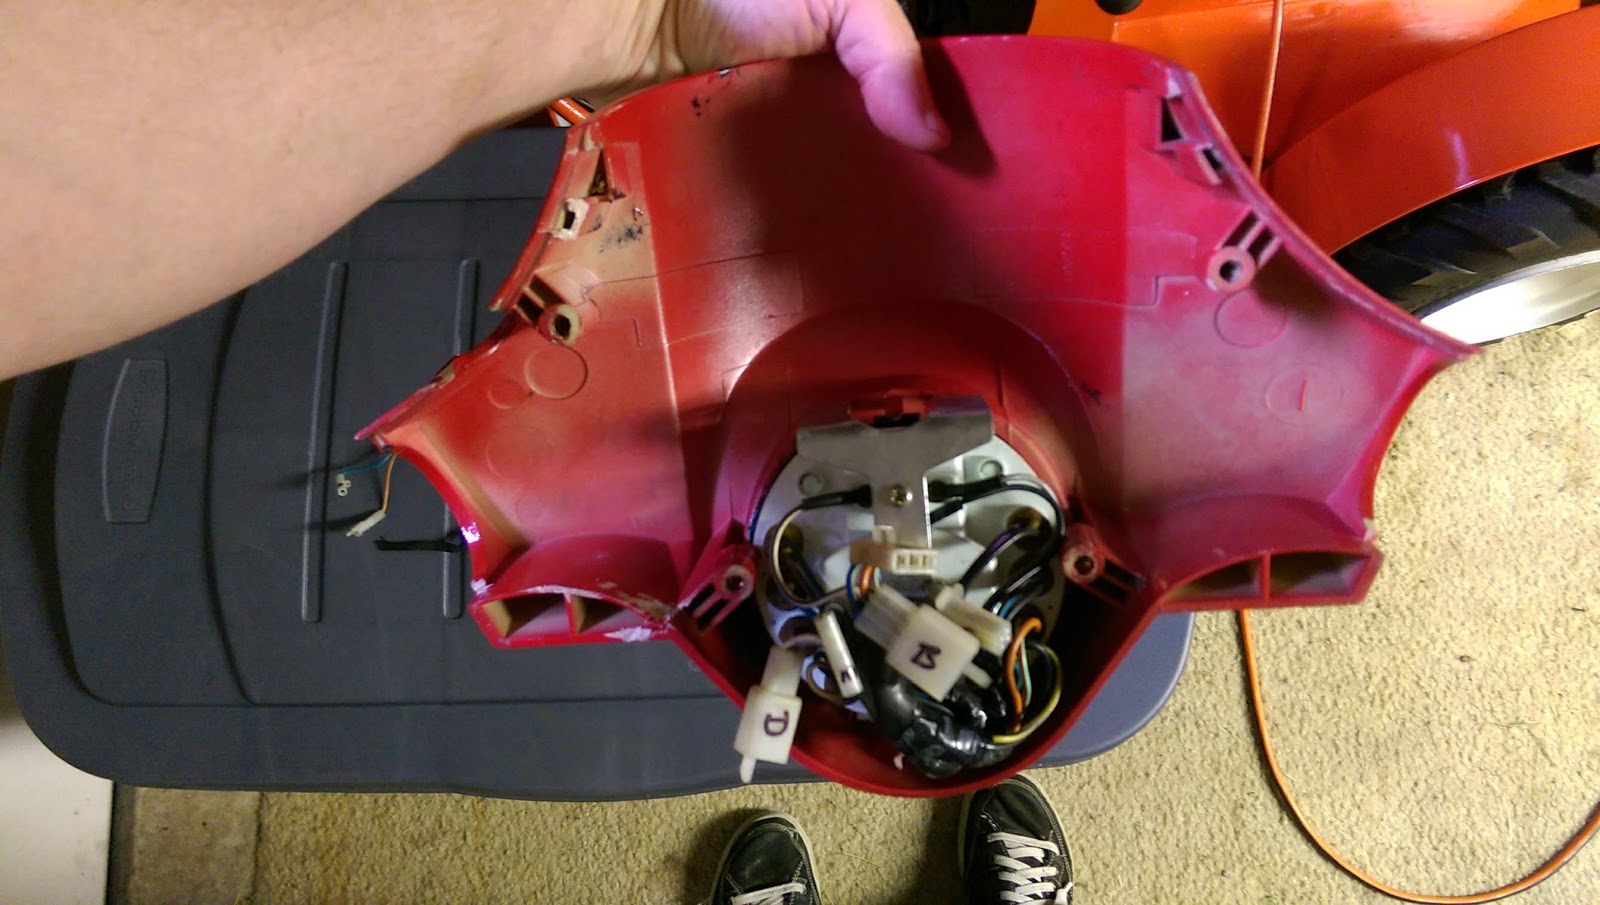
Broken headset, broken headlight, missing mirror.

We picked up Stella from a young fellow in Red Lion.  He was the second owner, and the scooter had been laid over.  The damage wasn't too bad.  I managed to straighten the bend in the leg guard enough to make it reasonable.  A little touch-up paint and some stickers and nobody would know.  The headset casting was another matter, that would need replaced.

 Take it all apart.

Disassembly was easy.  The wiring had to be repaired in a few places, but the damage wasn't all that bad.  The only really difficult part was threading the throttle cable through the body.  A word to the wise, make sure you can pull the new one in when pulling the old one out.
 Remember where it all went.
 Lay out all the parts.
 No one wants things bouncing around in the storage compartment...
so why not line the compartment with rubber from an old inner tube!

The Stella storage compartment is actually quite voluminous.  If the capacity were measured in beers, then a 12 pack would fit.  All it has to do is hold my lunch in the box.  The "curry hook" is perfect for carrying a growler full of craft beer.

 New black headset casting, painted red.

 Pound out the dents and fill in the scratches.

The previous owner made a poor attempt to fix the damage by the crash.  The paint didn't even match and the dents were still in the metal.  I'm pretty lousy at bodywork, but I was able to make it look as good as new.  The whole bike had been de-chromed.  Most of the bright work have been removed, so all that remains is a Red / Black color theme.  The only remaining chrome is the turn signal bezels, the mirror stalks, and front spring fulcrum cover.

 We are all smiles here.

 First trip into work.  Then off to get state inspection.

One thing I learned early on was not to fill the oil tank completely full.  The oil tank is above the level of the carb, but a level too high will overcome the check valve spring in the carb.  That causes oil to dribble down into the carb, and onto the reads where it sits waiting for you to kick start.  When that happens the whole crankcase gets a big mess of oil in it.  That results in the whole neighborhood being covered in a huge cloud blue smoke.  So I only fill the oil a little bit above the sight glass now.

 "Dad, when can we go for ice cream?"

"Stella" was the name of my beloved pet mouse, so I needed to personalize the scooter in her honor.  And I love checkered flags.

 Every bike I've brought back to life has worn an "UNDEAD" sticker.
It is simply the way of mad science.

The major complaint about this scooter was a little lack of power.  In talking to a few people about the 2T Stella design, I discovered that the emissions restrictions placed on this scoot really restricted the potential of the engine.  The said it really wasn't making the full 8 hp.  The catalytic converter is just too much of a restriction.  The amount of oily smoke that comes out of a two-stroke, I was convinced this exhaust was clogged with crud as well.  Upgrade to the SITO+ exhaust seemed like the best balance.  There doesn't seem to be a need to go to a 177 kit, or anything that would reduce reliability.  Something like the SITO+ should have been the stock exhaust from the factory.

 More POWER!

Scooter Mercato stocks all these jets.  (Dave is awesome to deal with and usually ships the same day.)
The SITO+ exhaust recommended re-jetting from stock is:
Carb, Idle Jet 55-160
Carb, Air Corrector Jet, 160
Carb, Atomizer Jet, BE3
Carb, Jet, Main SI 100
(old info... rejetted with DR177)

The worst aspect of this upgrade was cleaning things up before actually installing the exhaust.  It is possible to carry out this upgrade in an afternoon.

 Installing SITO+ exhaust.

Here's a poor video with the first startup with the SITO+ installed.  She started right up and ran with no problems.  Idle mix was about 3-1/4 turns without further tweaking.  I wish I would have actually timed myself climbing the hill in front of the house with a before and after comparison.  I'm quite certain the new exhaust is very much a performance enhancement.

Rejetted and SITO+ sounds great.

Feel the love, it's Genuine.