

Dedicated to the preservation, stewardship, and enjoyment of old things.
Thursday, December 23, 2010
Saturday, October 23, 2010
Cheap Rubber Parts
Grrrr. Why after only 5 years or so must I replace the fork gaitor rubbers? There's original rubber on the bike that's still holding up. Cheap new stuff. The new foot rest rubbers didn't even last 2 years. I put the original foot rest rubbers back on. Nothing against the vendor I got the stuff from, its just that this new rubber isn't the same as the original stuff. The rubber foot rests on the S7 are like new after 50 years!!! These gaitors didn't even last 5. You can see where I tried to hold it together with glue until I could get them replaced.


I just might bend the snot out of the center stand arm, so it will clear my shorty exhaust mufflers. Its a pain putting it back on all the time for service work. Its much easier when its permanently attached.
I hope the new ones last a bit longer.

The operation of doing this work oneself is a bit tricky. First position the ATV lift. Then find out that the ATV lift doesn't really line up with the center of gravity of the bike. The side stand is in the way. Then use boards to lift AROUND the sidestand. Strap it to the lift so it doesn't tip. Put a trolley jack under the rear wheel, since when the front wheel comes off, the center of gravity will shift significantly rearward. Then for extra insurance rope it to the ceiling rafters to prevent tipping when wrestling with the forks, and tightening the bolts.

Clutch cable fixed, oil changed, ready to go back on the road. Wow, the old girl is photogenic.... doesn't look that good in real life.

I just might bend the snot out of the center stand arm, so it will clear my shorty exhaust mufflers. Its a pain putting it back on all the time for service work. Its much easier when its permanently attached.
Saturday, October 16, 2010
Keyswitch overhaul
I wasn't happy with the broken light switch handle on my Sunbeam S7 Deluxe. I managed to score a pretty beat up electrical box from an S7 on ebay, which included a switch. The switch was worse shape than I thought when it arrived. Apparently the early models used steel setscrews, which rusted in place. This meant I had to drill them out and re-create some brass ones.
Disassembly was easy. First the back retaining stud for the tumblers had to be released from its fastening nut. This was easily done, by snapping the stud accidentally. *whoopsie* The front bezel turns and then comes off through some slots. This allows everything to come apart.


Disassembly was easy. First the back retaining stud for the tumblers had to be released from its fastening nut. This was easily done, by snapping the stud accidentally. *whoopsie* The front bezel turns and then comes off through some slots. This allows everything to come apart.

Making a key was easy. I just inserted the blank into the tumblers and then marked each tumbler position. Then I estimated the depth of each notch in the key, and began cutting with a dremel grinding disc.
The hard part was drilling out the setscrews. I only buggered up one thread by accidentally drilling crooked, the others came out without a problem.
The contacts were cleaned up and new setscrews fashioned. The original spring was shot, so a new one had to be made. This allowed the lamp switch to operate smoothly, but with enough pressure to make contact with the position detents. This picture was taken before the brass contacts were cleaned up and polished.

I had to drill out the fitting that the tumbler snaps into, and put a tap new stud in it. I made it long enough to fit two jam nuts on the end.
The switch assembles as easy as it came apart. The tumbler can actually snap in last. This makes the assembly MUCH easier.
Wednesday, September 29, 2010
Clutch Cable SNAPS
What do you do when your clutch cable pulls out of the end crimp, and you are 200 miles from home? You bodge it. On close inspection the crimp end just pulled out of its solder. The wire itself wasn't bent over in the channel provided to give extra strength.
Luckily the cable was long enough to tolerate some of the sheath being cut off. This was harder than it looked, since the outer casing is made of really hard spring steel. We broke a pair of dikes cutting it. I then took the extra-long exposed cable and lashed it to the handle. Vice grips were used to hold it in place, while a hose clamp was applied as extra protection. The travel was compromised so the clutch dragged a lot, but enabled me to catch it in gear and get going when stopped. It held the whole way home.

It was easy as long as I didn't have to stop. Traffic was a problem, but not insurmountable. Once I got the procedure down, I was able to push myself and catch it in first.
Luckily the cable was long enough to tolerate some of the sheath being cut off. This was harder than it looked, since the outer casing is made of really hard spring steel. We broke a pair of dikes cutting it. I then took the extra-long exposed cable and lashed it to the handle. Vice grips were used to hold it in place, while a hose clamp was applied as extra protection. The travel was compromised so the clutch dragged a lot, but enabled me to catch it in gear and get going when stopped. It held the whole way home.
It was easy as long as I didn't have to stop. Traffic was a problem, but not insurmountable. Once I got the procedure down, I was able to push myself and catch it in first.
Tuesday, August 31, 2010
If you wanna run cool ...
... add surface area
For those of us that live in a warmer climate than the Sunbeam was designed to run in, additional cooling is desirable. I've seen folks add an extended sump. Well, that's more oil to circulate, but when its all hot you are back to the situation of the standard sump, it doesn't help the engine run any cooler. It just allows you to run farther between topping up the oil. Fiddler Fred went to extremes and added an oil cooler and an oil powered grip warmer. I was looking for a quick solution that doesn't disturb my original machine too much, but just enhances its range and tolerance to warm ambients.
So I was thinking. If I add some more fins to the engine, I can make it cool better. The sump pan is already pretty low, so I can't add much, but its the most logical place. Its a nice flat area where I can strap a heat sink. The trick was how to attach it. I drilled hole at the back of the heat sink to locate the rear center sump stud. This keeps the heat sink from moving around. Then I made two clips to pull the heat sink to the sump securely. This locates the heat sink left and right, as well as keeping it secure. Thermal Mastic compound (a.k.a. "monkey shit") is a must!
It's a fairly inconspicuous modification and easily reversible. I'll have to take it out on a hot day and see if it helps. Any little bit of energy rejection has to help. The heat sink is rated for four Solid State "hockey puck" Relays, which handle 10 amperes a piece. It will handle more watts of energy in this application, but it will also be running at a higher temperature differential.

From the side

The ground clearance is only reduced by about 1.1". And no one will really notice the mod unless I point it out.
Saturday, August 21, 2010
Valve Adjustment
KYL95 was getting a little clattery in the valve area. I hadn't adjusted the valves since I put it back together, so I figured it was time.
They didn't seem to be too far off.

They didn't seem to be too far off.

Thursday, August 12, 2010
SUNBEAM bonnet letter spacing
Here you go Andrew. Hope your Imp is doing well.
Here's the spacing as close as I can measure on my '66 MK2. I know the bonnet has been repainted so I'm not sure if these measurements are 100%, but they look a damn site closer to "correct" than my wife's '67. Linwood tolerances.... ;-)

Some are measured from the flats of the letters, some are from the serifs. If I drew I line through the serif, then its measured from the flat.
Wednesday, August 4, 2010
How the S7 Deluxe looked in a period photograph???

This is my best attempted this evening to imagine what KYL95 may have looked like in period photograph when it was "new". Black and white, a little blurry, the edges of the film not quite developed...
Sunday, July 18, 2010
Mid Ohio AMA Vintage Races
The "Friends of Nature" motorcycle gang attended the AMA Vintage Races at Mid Ohio this year. We left Wednesday night, stopped in Bedford, then continued on to Lexington. It only rained once on Friday, and was great for the rest of the weekend.
We stopped at the Flight 93 crash site memorial, but there wasn't a memorial.... they're still building it. It should be rather impressive when complete. You can see a pile driver in the background.

From RT30 we took RT119 south and then I-70 west, cut up RT18 and then onto RT39 till we reached our destination. It was stinko hot out nearly reaching 100'F. Keeping hydrated was key. We stopped briefly in Steubenfille area for some lunch, to find the bikes slowly sinking into the pavement... well every bike except the Guzzi... the large kickstand is ideal for parking ANYWHERE. Italian engineering at its finest.

The trick is arrive early at the raceway. We got primo parking spots in the middle of everything, so we could return to the bikes for things.
Going through the swap meet area is always the best. You never know what you might see. It was rather annoying to have to dodge all the people on their pit-bikes. We eventually gave up and stood our ground, since they weren't supposed to be running around on bikes throughout the facility anyway. We saw some awesome examples of British, Italian and Japanese bikes. Curtis found a modified CB77, with a 350 four cyl engine. It was sweet. He should have bought it on the spot. Well worth the price in my opinion. There were lots of Guzzi's running around and some for sale too. I kept getting enthusiastic waves from the Guzzista in attendance. (We are a passionate bunch you know) I had the only modern Cali in attendance.
Most notably for me there were two Sunbeams for sale. An early S7 and a later one. They were in rather sorry shape, and the owner didn't seem too interested in parting them out. (I really could have used that later model dynamo.) The black early S7 wasn't too bad. It probably needed a head gasket and the gearbox rebuilt. Most of the parts were there.

We elected to stand in line Saturday to ride the CAN AM Spyder. What a waste of time. They were horrible. Flappy Paddle Gearbox was worthless, the handling was twitchy, and the engine sounded as if it would tear itself apart with vibration. All our throttle hands got numb on the short ride, and we condemned those 3-wheel monstrosities as unfit. If they didn't have traction control and a computer onboard, then they would be downright deadly.

All in all we had a great time, watching the racing, and checking out all the bikes on display and for sale. All the bikes performed flawlessly. My California likes the open highway, but perhaps a windshield will be in order... and maybe a throttle lock. I think we'll do it next year as well.
Saturday, July 17, 2010
A10 Fork Springs on S7 Deluxe
The recent subject matter of discussion in the Sunbeam Owners Fellowship got me thinking about how to cure the bouncing front end of my S7D. The suggestion was to swap out the stock fork springs for slightly longer ones used on the S8, or from a BSA model A10 Rocket Goldstar. It seemed an easy enough task after reading the Bedside Book. I easily obtained NOS springs from the UK and went to work.

The top cap nuts and steering head bearing tensioner came out easily.
I then backed off the pinch bolts on the top triple tree. It easily came off with a few bumps from a rubber hammer underneath. I laid it carefully back against the tank with a towel. (A good man always knows where his towel is. I like to think of myself as a really hoopy frood.)
After jacking up the front end, the screws from the spring shrouds came off and I protected the mudguard with some towels as well.


The ease of dismantling was interrupted by a trip to Harbor Freight to get a bigger adjustable wrench, since I didn't have one quite big enough to take the bottom nuts off the forks.


The top cap nuts and steering head bearing tensioner came out easily.
I then backed off the pinch bolts on the top triple tree. It easily came off with a few bumps from a rubber hammer underneath. I laid it carefully back against the tank with a towel. (A good man always knows where his towel is. I like to think of myself as a really hoopy frood.)
After jacking up the front end, the screws from the spring shrouds came off and I protected the mudguard with some towels as well.

This was too easy. The next part involved some clever improvisation. I didn't have the right spanner to remove the nuts from the top of the triple tree. So I had to make something. I took the next largest size socket that I had, which happened to be 1-5/8"... then taped two 10-32 screws to the inside of it. This way the screws would grasp the notches in the nuts, and turn them off easily.

The nuts easily came off and I had access to remove the headlamp and brackets. I left them as one piece and set them atop the handlebars and top triple tree.

The ease of dismantling was interrupted by a trip to Harbor Freight to get a bigger adjustable wrench, since I didn't have one quite big enough to take the bottom nuts off the forks.
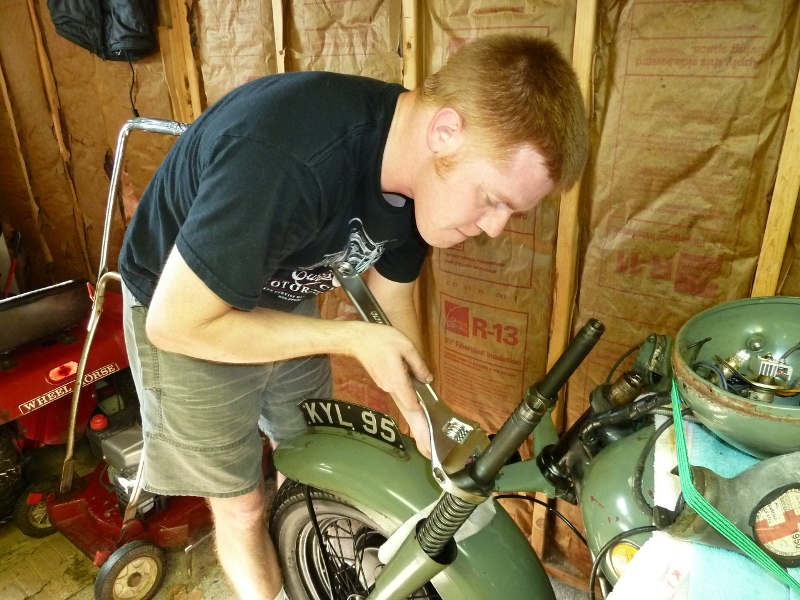
Reversing the order of disassembly, puts it all back together. The forks are rather stiff now. I hope this improves the handling as much as everyone says. Tomorrow I shall find out. No sense in going out to try out the handling in the dark... especially when there's a new Doctor Who episode on.
Wednesday, July 14, 2010
Monday, June 28, 2010
White Rose MC Club, Springfield Indian Club Antique rally
I set out proudly on my S7D having a great deal of confidence that my noble steed would deliver me safely to Jefferson, PA and back. I was not disappointed. I met up with a friend who has a meticulously restored '48 Harley-Davidson. Our bikes were a great match for riding together. The Sunbeam accelerates slightly faster, probably because it weighs less... or it could be that the hand shift on the Harley makes it a little more cumbersome.
We took a leisurely 40 to 50mph pace. There are a few clatterings from the valve rockers, but nothing to really be concerned about. Oil flows freely and with enough pressure at speed to keep my mind at ease. Even at +90'F temperatures on the return trip, the oil light only flickered when idling in traffic.
We met with some interesting characters at the White Rose MC Club facility. I finally met Bob and Mrs. Bob from Bob's Indian, just a few miles from my home. They've been running the rally for years. There was a fellow from Virginia who had been coming for 40 years. He recently had a barn fire which destroyed his collection. He managed to find a beautiful Roadmaster to bring to the show. His grandson was with him carrying on the legacy. That's great to see. We were lucky to see some non Indian classics as well. There was a Matchless that drove in, along with a very original Henderson 4.
Attention soon turned to the Sunbeam. I met a SOF member Bob from Maryland. I gave him this website and I hope he'll write in. He's got a Polychromatic Grey S8 that he's got roadworthy and I'm interested to see photos. I'll surely see him again in October for the Antique swap meet since he's apparently quite the eclectic collector.
All in all it was a great morning. I covered over 70 incident-free miles on KYL95 and I'm proud that its able to go out under its own power for exhibition.

Thursday, June 17, 2010
Deluxe on the first big trip
Here you go, photographic evidence that KYL95 runs well enough to actually transport me somewhere. I took it into work, where a curious crowd soon surrounded it.

I discovered that the oil leak from the head isn't really that bad. The brakes work great. And there are no insurmountable issues with a hot restart.

I discovered that the oil leak from the head isn't really that bad. The brakes work great. And there are no insurmountable issues with a hot restart.
The concerns that this trip generated are only a few.
- First, at about 45mph on gradual deceleration downhill, the front suspension goes into an oscillation. The symptom is very repeatable. I'm not sure if this is a damping problem with the forks, or if my front wheel is slightly out of balance. Re-balancing the front wheel will be the first treatment.
- Secondly, the clutch needs adjusted slightly when warm to insure proper disengagement. The gearbox got slightly "clunky" when it was hot, which tells me that there was a little bit of drag and the shifts weren't happening cleanly.
Overall the trip was a complete success. Everyone was intrigued by KYL95 and it performed like the engineering marvel it was built to be.
Next stop... White Rose Motorcycle Club, Antique Rally
Thursday, May 20, 2010
Bonnet Hinges
I've had new bonnet hinges in a box for about a year. I've just been procrastinating the installation. Last night I decided at 8pm to start ripping the bonnet off and replace the tatty old hinges. They're slightly corroded and the chrome is gone down to the nickel.
Tuesday, April 20, 2010
Starting the Deluxe cold
This video says it all. After sitting for a week since I tuned the ignition timing, it starts on the second kick.
Almost ready for a decently long trip.
Almost ready for a decently long trip.
- The dynamo is working well
- The oil leaks are slowly being cured
- The breather hose to the back has been installed
- It seems to start alright when warm
Tuesday, April 6, 2010
Sunbeam S7 Deluxe tuned and adjusted
The engine has been hard to start, and hasn't seem to had the right amount of torque at low revs. I figured that it was too far advanced, and I should back it off some. I'm not halfway between the original mark on the distributor and where the book said to set it. It runs much better.
Also, the clutch travel wasn't right, so I took the blob of tape off the handlebar to find that someone had adjusted the clutch cable with a washer holding the sheath out away from the handle. That explained a lot. I removed the bodge, and then remembered that the clutch slave arm wasn't symmetrical. Its actually made so that its bent a little and can be put on either direction. This meant pulling the rear fender out of the way, and undoing the jam-nut and screw that holds the arm in. With that done, I flipped it around and then readjusted the clutch adjuster so that I got better travel and engagement at about where I wanted it. The clutch is much better now and the bike even shifts better since its disengaging better. Previously it would clunk pretty loud when changing from 1st to 2nd. Now its smooth. Probably smoother than my Guzzi.
I still haven't taken it very far. The engine runs hot even though its running a little on the rich side. The rings are likely still rather tight.
Sunday, March 28, 2010
Scotland in Industry
Sunday, March 14, 2010
Checkered Tape
The XS650 needed something a little extra to make it more interesting. Otherwise it looks just like any other black 70's rice burner parked in the lot. I put a stripe of Checkerd Tape down the tank and the rear fender. It really grabs your attention.


Sunday, February 14, 2010
Tax Disc Replica
I had the urge to put a replica tax disc in the holder for my De Luxe. There was a comical note in there when I got it written crudely on the back of a cardboard box lid. It read "Tax in Post". I'll just leave that note in there to be re-discovered later.
There are folks who make and sell nostalgia replica tax discs, but when have I ever spent money so frivolously? Especially when its something I can do myself.

Can any of you anoraks tell that the design isn't quite right for 1950?
Print it out (on your choice of aged printing material) around 3" in height and it should fit reasonably well. Cut along the dotted lines. My rubber grommet for the glass has seen better days. So I used an old piston ring to make sure it stays in place.

Wednesday, February 10, 2010
Extinguisher
After being frightened by seeing pictures of burned Sunbeams running the original Amal 267 carb (old leaky), I thought a fire extinguisher would be a good idea. While a period-correct extinguisher all brass and shiny would be very cool, if it didn't actually put out any fires it would be useless.
Just like carrying an umbrella protects one from the rain ever falling, carrying a fire extinguisher should protect my bike from ever catching alight. I got a good cheap black-chrome extinguisher from eBay. Its rated ABC and should be good for whatever. Its reasonably small, and came with a mounting bracket.
So, my first inclination was to mount it near the passenger footpeg holes. This proved impractical, because there was no convenient way to mount the top. The second inclination was to mount it behind the passenger seat. But with such a large mass , I'd have to make some fairly heavy brackets to support it without vibration.
My last thought was to eliminate the seat altogether and just mount the extinguisher behind the driver seat on the existing mounting holes. This is a two-fold advantage. I don't like the passenger seat, I'm not permitted to carry passengers due to my antique insurance limitations, and there are no passenger foot pegs. The second aspect is that there are big nasty holes in the rear fender that would no longer be "hidden" if I ever took the seat off. The extinguisher hides the big ugly rusted holes. Its not the most beautiful installation location, but it is practical.
I know it looks a little dumb, but what else can I do? Any comments.


The fire extinguisher won't win me any beauty contests, but I won't worry about catching "old leaky" on fire.
Tuesday, January 26, 2010
Ready for the Long Haul
The Guzzi is ready for a long trip, which I haven't planned yet. (But I'm ready.)
I got a set of Hebco-Becker bags with mounts intended for an EV. I had to make a bracket on each side to correct the mounting points for my Aluminum, but they still worked out rather well. I still need to provide a third mounting point to give the mounts rigidity in the horizontal plane. I plan to pass a strut behind and attached to the license plate bracket and onto the mounting clasp latchplate. That should give the extra side-to-side rigidity required.
The bags didn't come with the colored plates which bolt to the outsides of the bag. I just filled the holes with RTV for the present time.
No more slipping out between the XS650 and the car now.

Next could be a hydraulic clutch???
Saturday, January 16, 2010
Petrol Taps
After consulting with the gurus at the ClassicGlory mailing list to confirm the Enots and Ewart type petcocks were rebuildable; I dove right in and stripped them down. Unfortunately KYL95 has a mismatched set of petrol taps. Left side is the original Enots type and the right side has a Ewarts valve.

The Enots type came apart easily and it was obvious that the cork seals were the original ones. There was still a good bit left of them. Still I'm impressed with the resilience of natural materials such as cork. I decided to use real cork to replace them since I didn't have any neoprene handy. The challenge is cutting the wine cork the right thickness, and making the cut parallel. I managed a couple attempts with limited success until I got the feel for it. Lengthwise with the grain obviously works better, and some gentle sanding gets it to the correct thickness. I did a pressurized water test before reassembly and it works fine. The slider is a bit scarred up, but its still pretty smooth.

The Ewarts type was a bit more challenging. The rounded cork shape was not something I was prepared to replicate at the moment. That would mean drilling out the centerpunch and then re-creating the whole brass inside part. So I cheated. I clipped the bad edge part of the cork plunger with a razor blade, and fitted a viton o-ring around it so that the o-ring would seal the plunger to the outside and stop it from leaking outside. It doesn't seal 100% in the closed position, but as long as it doesn't leak down the side of the bike anymore. I think I'll have to make a more permanent solution here... like maybe the correct Enots valve.


I didn't take photos of the fuel filters taken out of the tank. I should have since they were a sight. The right side was nearly blocked with varnish and junk. The left side had some varnish on in, but wasn't nearly as bad. A little carb cleaner and some gentle brushing cleaned them up nicely.
Sunday, January 3, 2010
Brackets on fork tubes?
Since my own S7 Deluxe is the only one I've ever seen in person, I have nothing to compare it against. Can anyone tell me what these brackets are supposed to be for on the top of each fork tube? They rotate under the bolt which closes the top of the fork tube. There's a small hole in each one where the end is bent up. What were these intended for?


Saturday, January 2, 2010
Guzzi California passenger comfort (part 1)
My wife has complained that the California is uncomfortable and she'd much rather ride on the XS650 as a passenger. This cannot be! That's the reason I bought the Guzzi so I could carry both of us in comfort and finally remove that hideous XS750 sissybar from the 650.
The two issues are foot position and seat comfort. This fix should solve the issue of foot position. With her riding boots comfortably positioned with the heal against the peg, her toe interferes with my heal. So, she rides with her toe on the peg with significant discomfort over longer distances (great for the calf muscle workout however). So, I saw this article describing the use of stirrup pegs on the rear. It looks like just the thing. It gives her heal somewhere to rest and keeps the pipes from receiving melted boot rubber from the heal. The pegs are Küryakyn Model 8075. Many thanks to Marina for this accessory tip.
The two issues are foot position and seat comfort. This fix should solve the issue of foot position. With her riding boots comfortably positioned with the heal against the peg, her toe interferes with my heal. So, she rides with her toe on the peg with significant discomfort over longer distances (great for the calf muscle workout however). So, I saw this article describing the use of stirrup pegs on the rear. It looks like just the thing. It gives her heal somewhere to rest and keeps the pipes from receiving melted boot rubber from the heal. The pegs are Küryakyn Model 8075. Many thanks to Marina for this accessory tip.
Subscribe to:
Posts (Atom)